
I built this statue of Astro Nomical, a Salesforce character from their Trailhead software, for Salesforce’s TrailheadX 2021 (TDX21) virtual event. This piece was designed to scale with my Salesforce sculpture from last year’s event, TDX20, which was a statue of Codey the Bear. This year’s model, which is nearly 16” (40cm+) tall and consists of over 3,000 bricks, was a formidable undertaking mostly because of timing; just like last year’s piece, I had to complete my design and source the necessary bricks for it against an extremely tight deadline, which was a live-build of the final model for a virtual event.
My recreation of Astro intentionally emulates my LEGO Codey in terms of its design, composition, and techniques; as such, many aspects of the process were ones with which I’d already had experience. However, this project posed some new opportunities for growth, too. For example, Astro’s base includes a lighting element, the which I had to integrate with a LEGO-built infrastructure. The model also features custom decals, modified LEGO bricks, and a pretty dynamic pose.
I feel that LEGO-built Astro pays appropriate homage to my first TrailheadX live build model; in doing so, it reinforces a set style for my burgeoning Salesforce character series. But I also feel that this model advances my character-building format into new territory and breaks ground of its own, which makes me even prouder of the finished result!
Read on to learn more about the conception, construction, and design of this custom statue.
Conception — A Return to Form

Final approved artwork for the Astro statue
Salesforce planned TDX21 in conjunction with the George P. Johnson agency (GPJ), a world-class event planning and experience marketing firm. Representatives from GPJ re-initiated our contact in advance of TDX21. It was great to hear from the GPJ team, as I’d had tons of fun working with them during our first collaboration.
Like before, Salesforce and GPJ sought to create entertaining interstitial content between TDX21’s myriad speakers and segments. Since my on-camera assembly of a Salesforce themed LEGO model was such a hit at TDX20 last year, the Salesforce/GPJ team wanted me back to create another live build for TDX21. I was thrilled at the invitation… even though I’d have to execute the whole project in less than two months, and do it all concurrently with the lead-up to my post-COVID wedding celebration and honeymoon! I knew the project would be a crazy whirlwind, but I also felt confident that I’d be able to get it done, so I agreed to jump onboard.
For TDX21, Salesforce decided that they wanted a LEGO model of Astro Nomical, the gender-neutral pseudo-protagonist of their Trailhead software. It was a great choice, since Astro is cute and very distinctive. Still, there were two big questions regarding capturing Astro in LEGO that the GPJ team wanted to pick my brain about. One: how big should we make Astro? And two: what can we do to differentiate this year’s model from last year’s model?
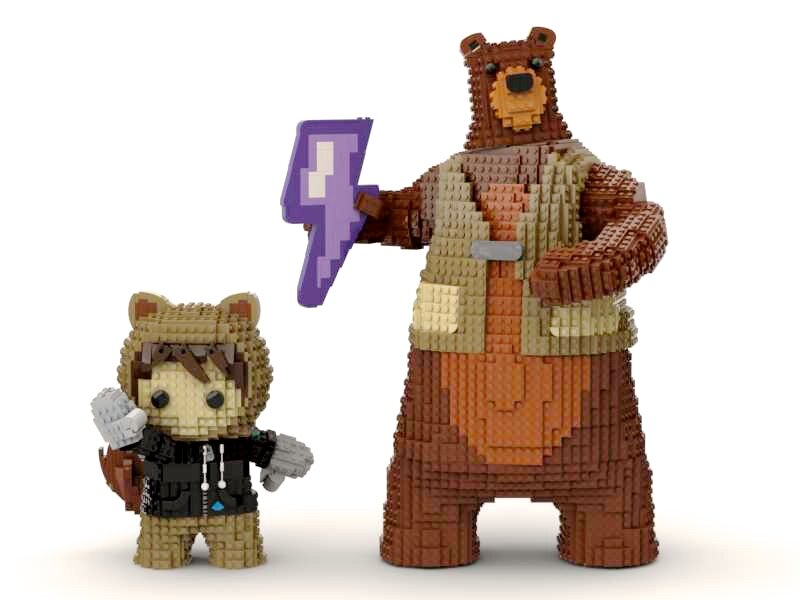
A virtual representation of LEGO Astro & LEGO Codey together, demonstrating their different sizes
The size question was an interesting one, because our options boiled down to either building Astro at the same size as Codey (i.e., an 18”/45cm character) or in the same scale as Codey (i.e., built in such a way that Astro and Codey, if standing next to each other, would be accurately proportioned to each other). While an 18” Astro would perhaps have looked more impressive on camera, it would’ve actually take much more labor than even Codey had; due to Astro’s stockier proportions, the volume of bricks and scale of my design would have been significant. Given our rapidly-approaching deadline, I thought that a scale Astro (a ~9”/23cm character) would be the smarter choice, and give us the breathing room we’d need to ensure the design got perfected in the limited time we had. As such, we decided to pursue a 9” Astro.
As for the differentiation question, my idea was to incorporate a lighting element inside the sculpture’s pedestal. This would allow the emblem/text emblazoned upon the pedestal— which would be chosen via Twitter poll during the TDX21 live broadcast— to turn out extra vibrant and special, making the audience participation aspect of the LEGO model even more “alive” than it’d been last year. The team was thrilled with this idea, so we proceeded with a lighting plan in mind.
Final color test, proof model
The first thing that I needed to confirm before I could begin work in earnest was what LEGO colors I’d be constructing Astro in. Last year, Salesforce had provided me with a Trailhead character style guide, which was extremely helpful this time around for getting a clear look at Astro and seeing them from multiple angles. However, the CMYK values and PMS swatch colors indicated for Astro didn’t math up perfectly with LEGO hues, so I chose colors that would approximate them best, and then submitted a color proof to Salesforce for approval.
With colors approved, I had clearance to begin design in earnest, so I got right to work!
Design Process — Stud Math & Sizing
The first step in my planning process was to establish Astro’s height in terms of LEGO studs. I knew I’d be sculpting Astro studs-out, like I’d done Codey, so it was critical to determine the character’s proportions in terms of that unit of measurement so that I could know how many “layers” of outfacing studs I’d have to work with.
To do this, I printed out a large copy of Salesforce’s final artwork, then measured the height of Astro on the printed design in terms of inches. Since I knew the character would have to be 9”— or 28 studs— tall, I used some mathematical conversions to establish a reliable ratio that let me convert a between inches on the page and studs in real life. Thereafter, all I had to do was measure any part of Astro’s body on my printout, convert it using my ratio, and I’d be able to ascertain or check the ideal studded measure for that body part on the sculpture.
Another sizing question that ended up changing midway through my design process was the height of the pedestal Astro would stand on. Initially, I pitched the team on a 9” pedestal to go with the 9” Astro, which would give Astro (a shorter character than Codey) more presence if the two models were ever displayed together. Upon seeing renders of the design, though, we came to the realization that the 9” pedestal dwarfed and upstaged Astro. Luckily, I was able to compress the pedestal by more than 2”/5cm, which was as short as I could go while leaving our lighting mechanism intact.

A render of Astro on a 9” pedestal, our original design

A render of Astro on a 7” pedestal, our revised design
Assembly — Live on Zoom
For TDX21, the GPJ team really pulled out all the stops! A skilled professional came to assist me in my studio not just on the day of the event, but the day prior as well for a tech rehearsal. She set up the lights, camera, and sound equipment, and ensured good WiFi connectivity for my event appearance.
I sat at this temporary build table for nearly 4 hours during the event, rapidly assembling my pre-designed Astro model. I’m glad my inventory shelf really got a chance to shine… while I had most of the necessary bricks pre-sorted and prepped, I did have to turn back to my boxes on a few occasions to snag the right pieces.
I love participating in these sorts of events. They give me the chance to demonstrate the “craft” and artistry of LEGO building to people who may not have had exposure to the finer points of the medium in the past.
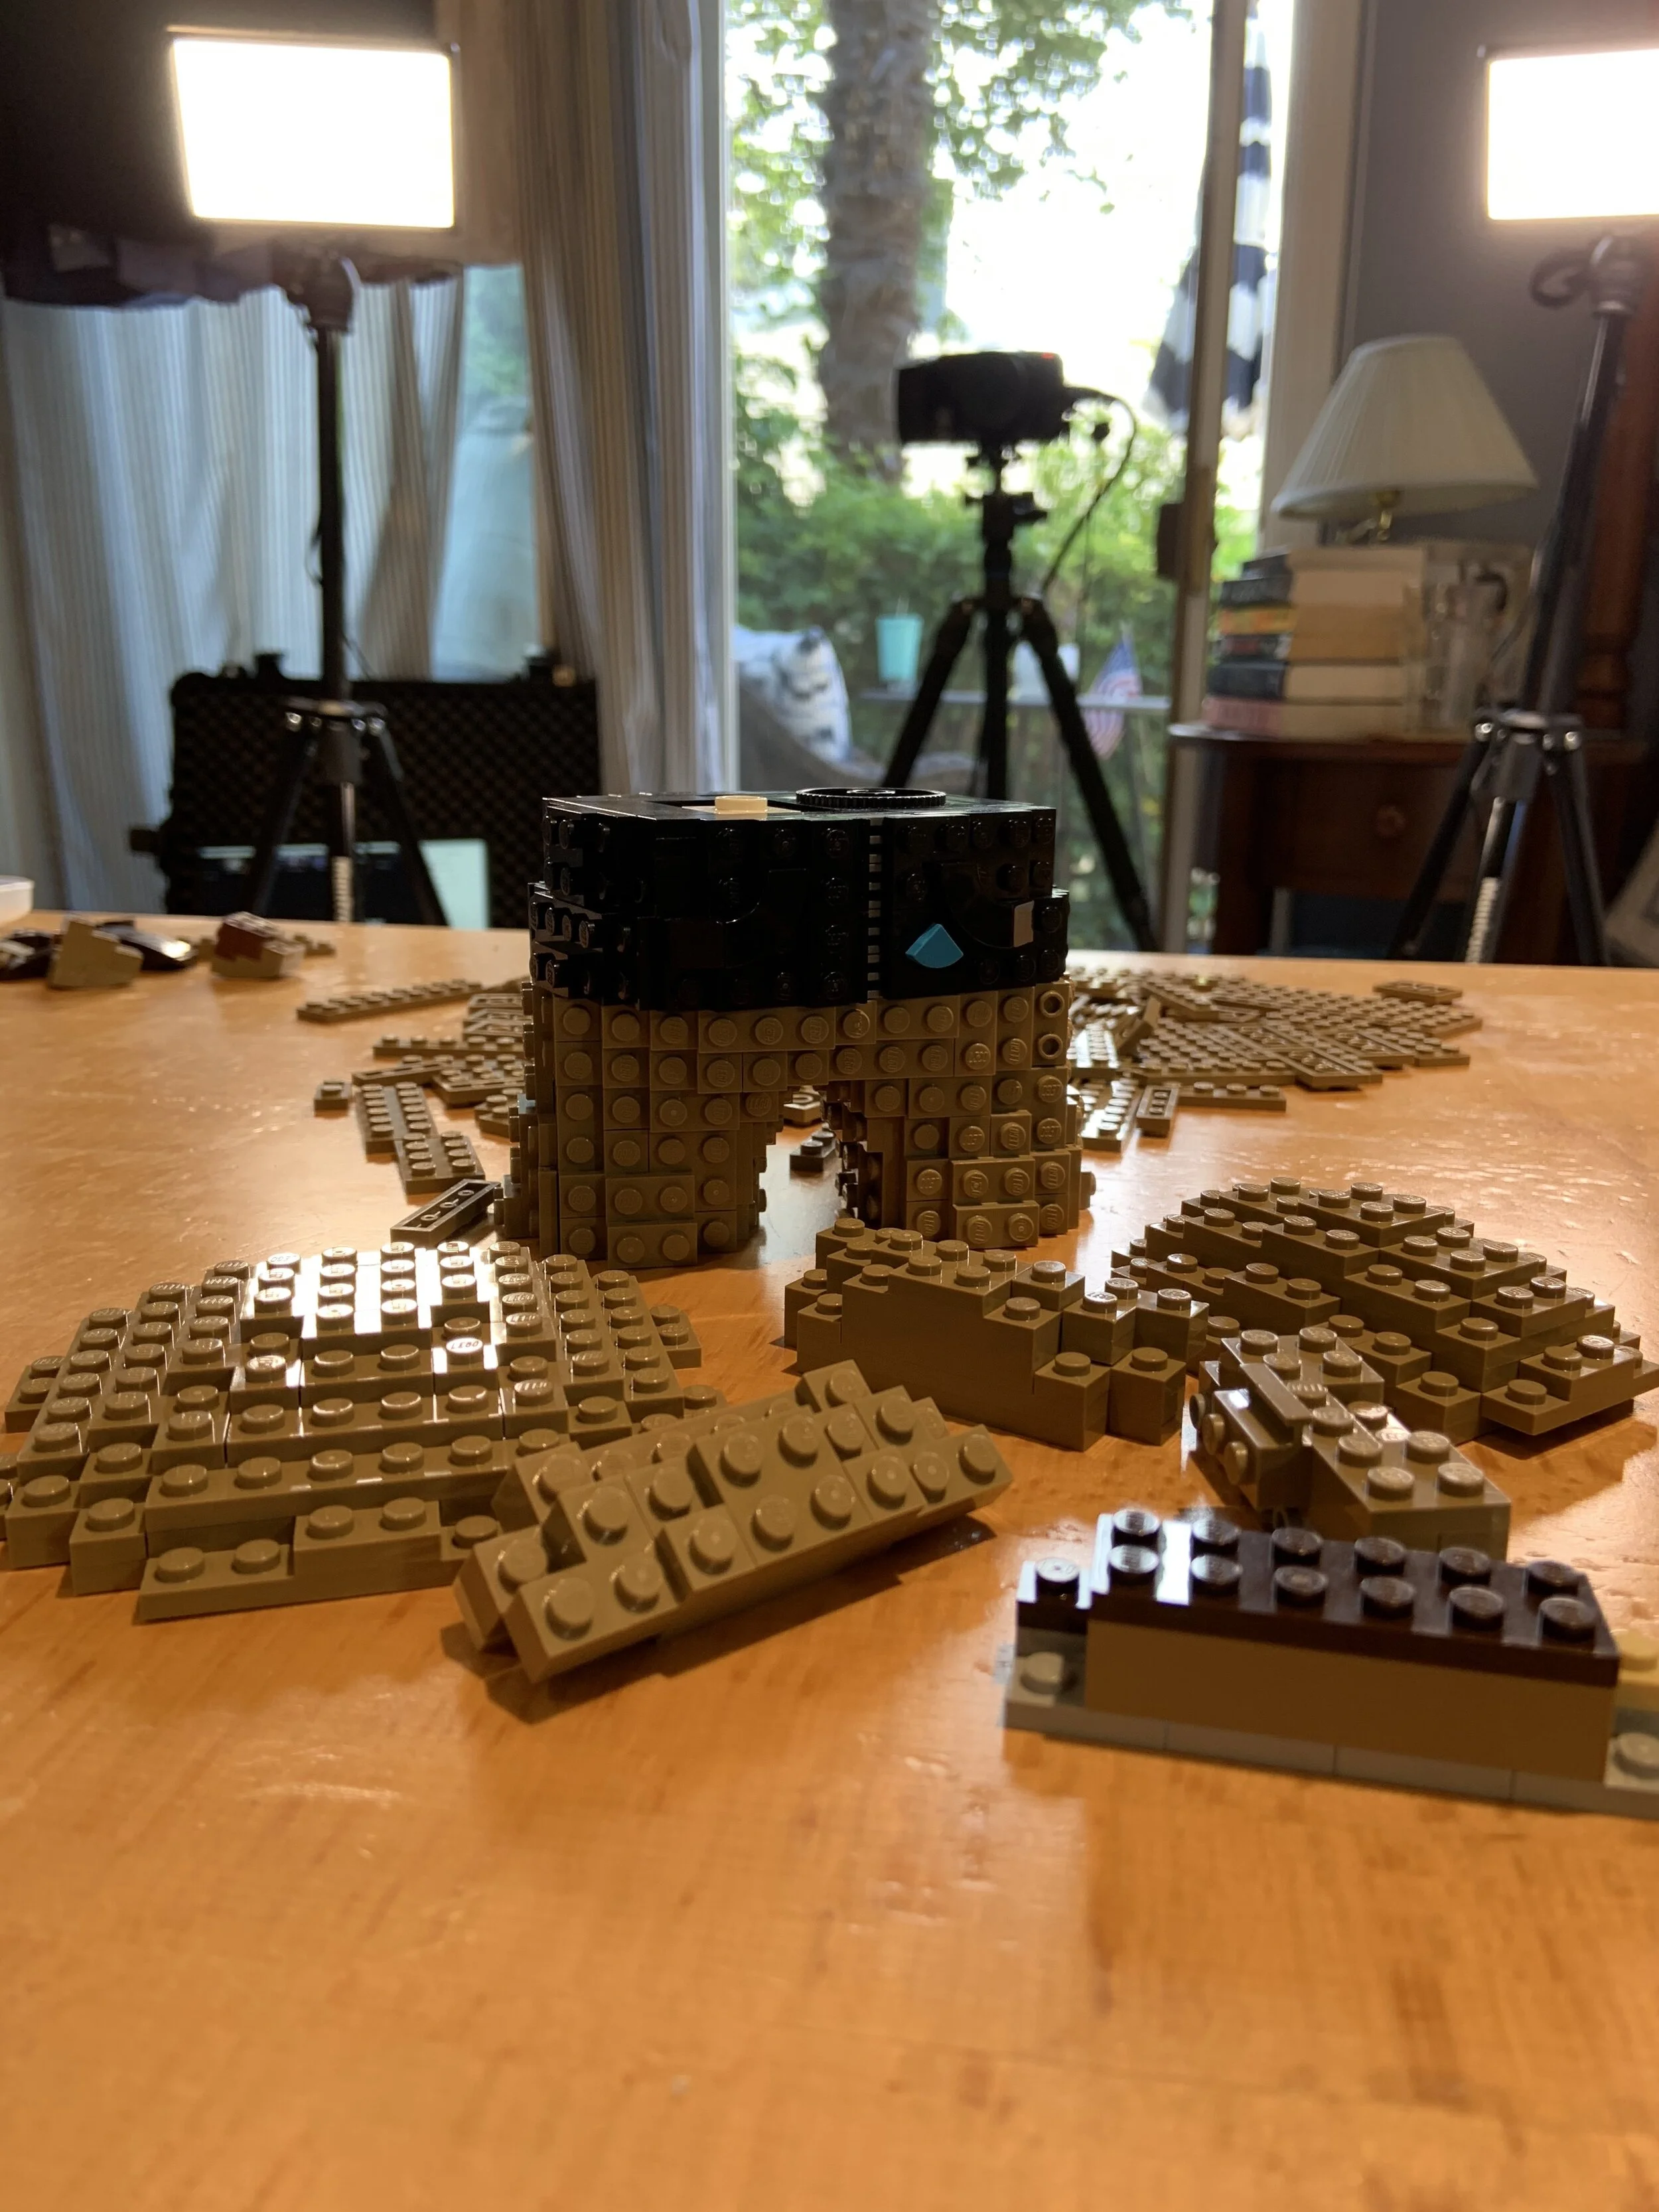

The first thing I assembled was Astro themself, and I began the character from their feet. Like Codey had been built, Astro’s body was comprised from carefully sculpted sections of plate-built “skin” held in position by hidden SNOT (studs not on top) frameworks. The body was subdivided vertically into 4 layers, each of which torqued slightly on the one below it, allowing for an organically twisting “spine” for the model.


Some of my favorite bits of the design to manifest in real bricks were Astro’s more signature details, like their fox tail and their featureless kawaii face. I designed the build to be roughly modular, so that large sections like this could be assembled separately and “hidden” until the last moments to make the sculpture’s final reveal more dramatic!

Finally, once all the component pieces for Astro’s body were done, I began work on the pedestal. The first part of this I completed was the bottom, which integrated a deconstructed clip lamp with a daylight bulb.
The infrastructure which holds the lamp in place was a fun challenge to design. It uses some rubber LEGO components to create a good grip, and uses some slider plates to guide external actuators that flip the lamp’s switch either on or off, depending on which side gets pressed.
Even though the innards of the pedestal’s hollow box wouldn’t be visible, I opted to build any parts which would be exposed within the cavity in white bricks, to maximize light bounce within the box and so create a more diffuse glow for all the light-up apertures.
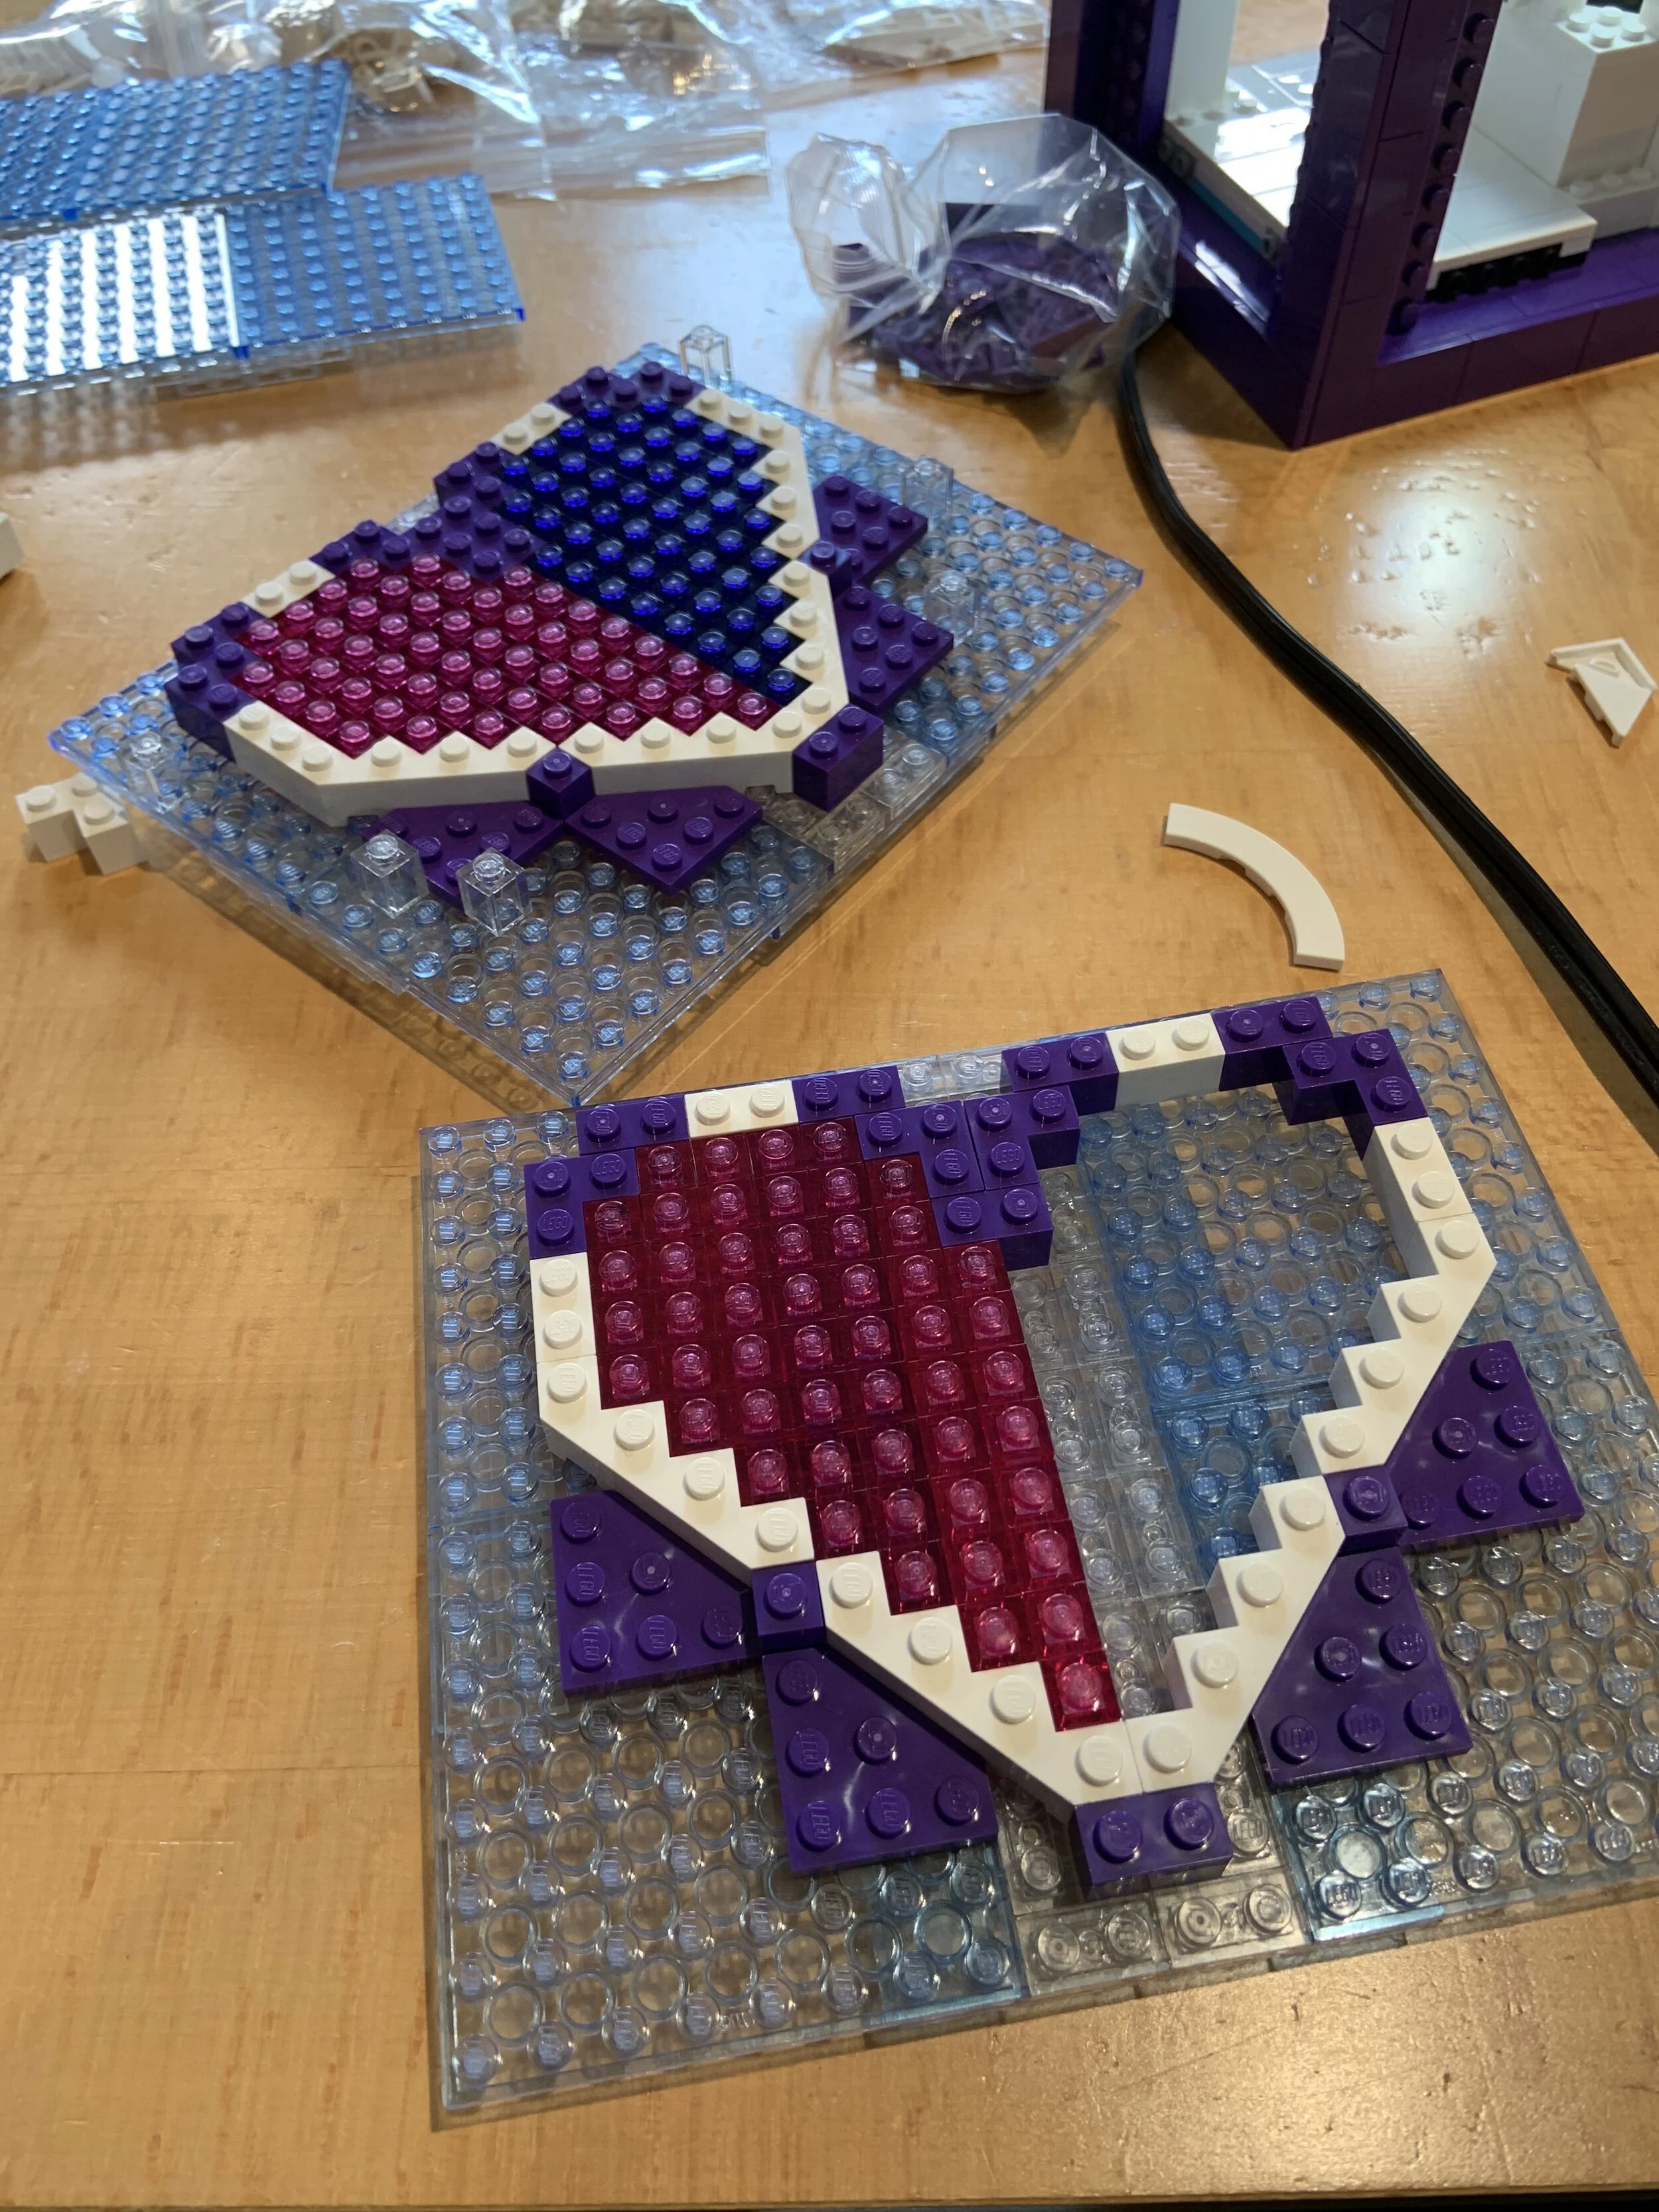
Just 90 minutes prior to the event’s end, I was told the results of the audience Twitter poll regarding the design for the pedestal’s face. Popular vote had chosen a purple & pink “Trailheart” logo! The other choices had been the Salesforce cloud and the text “TDX21,” which I’d also prepared templates for just in case they got picked.
As you can see, the sides of the pedestal “box” were made out of 8x8 plates in a rare and expensive color: translucent medium blue. Though these beautiful plates were fully and intentionally hidden by the final purple surfaces of the pedestal and the luminous overlay elements, I had no choice but to use these larger plates. They were the only pieces I could use to ensure simultaneous stability and translucency across the box faces.
The side panels are also built translucently. While they don’t have any special logos on their faces, I left some 1x1 gaps through which light could shine, which would eventually be occupied by “stars.”
After 3.5 hours of live building, I emerged from TDX21 with Astro completed. The on-screen reveal was especially satisfying for me, because this was also my first time seeing the sculpture in real life after having composited it on the computer. Astro looked awesome; I was pleased to get a warm response to the model from my collaborators as well as event audience members. It seems like this piece was a hit!
Design Choices
Final statue, front view
Final statue, back view
My LEGO Astro model follows in the footsteps of LEGO Codey in terms of its basic appearance. I once again built an earth-toned character, 3D sculpted by SNOT plates, standing atop an intricate purple rectangular base with clean-cut siding and dots of sporadic accent color. The broad strokes are the same.
In terms of composition, I think the model looks great. Our choice to make the base slightly shorter than originally budgeted for has helped keep Astro the focus of the piece, while also giving the model additional presence and providing ample real estate for that beautiful, “stained glass” Trailheart. The color and texture juxtaposition between Astro and the base also works really effectively, in my opinion; the industrial feel and cool colors of the pedestal accentuate Astro’s “fuzzy” texture and warm, inviting hues by contrasting them.
Anyway, let’s discuss some of the finer points of the design…
Like I mentioned earlier, Astro’s body is assembled of 4 layers: legs & waist, lower torso, upper torso & shoulders, and head. Each layer pivots slightly on the one below it, breaking up the rectilinear shapes inherent in LEGO plates. More importantly, this mild torque enables the static pose I’ve given Astro, with legs planted squarely but the right shoulder angled forward in an excited wave.
Getting Astro’s shoulders at a different angle than their hips was a trick I learned by necessity while designing Codey, but on Astro the arms took some finagling to attach at the correct angles. The waving hand’s arm juts out straight from the shoulder but the inactive hand’s arm is pivoted slightly forward.
As I usually opt to do in cuddly creature and character builds— and in lucky accordance with Astro’s character design!— I chose rounded black pieces for Astro’s eyes. Black bounces light really well, especially if it’s curved, which makes these wholly inorganic eyes seem alive; this is the same trick used in stuffed animals! In Astro’s case, I used boat studs, which are bigger than the Technic ball joints I used for Codey but have that same luster.
Astro’s wavy haircut was one of the hardest parts of the character to design, since it breaks away so dramatically from all other lines on the character. I made some of the swoopiest bits protrude out from under Astro’s hood because I had no other choice, but this design gives the hair extra volume that I quite like!
During the design of Codey last year, I was learning as I went along when it came to exploring the SNOT-plate-sculpting technique you see on display again in Astro. This time around, I better understood the “rules” of building rounded shapes from square bricks, so the curves on Astro are far more deliberate and clean than those on Codey had been. I’m especially proud of how beautiful and M&M-shaped Astro’s head looks.
Astro’s black sweatshirt was requested specifically by the folks at Salesforce, and I had a lot of fun nailing all the little details which, though small in comparison to the rest of the model, totally sell this part of the build as a sweatshirt rather than just an extension of Astro’s animal onesie.
The “Trailblazer” text across the chest is a custom decal that the GPJ team kindly prepared for me to fit on two 2x4 tiles. Positioning these flat surfaces to match the contour of the rest of the body proved a challenge, but one I feel I executed well. The drawstrings are cut short from their normal length to fit here; it’s not “pure” LEGO, but it was the cleanest solution so it’s the one I chose.
Of all the details on this model, my very favorite is the zipper!
Astro’s tail was rather slapdash to build because, unlike the rest of the body’s level studs-out finish, this portion of the model has a spiky, ruffled fur texture. I built the tail’s SNOT core very deliberately— I even had to chart it out on graph paper beforehand to ensure the right curvature— but I built the exterior surfaces with whatever slopes looked best to create the shape, and there was very little rhyme or reason to that.
Like Codey’s pedestal, Astro’s base employs a technique called greebling to create a nondescript mechanical impression. This year, I opted to make the whole pedestal in dark purple, with no accent colors beyond those of the logo design and some luminescent “stars” scattered around. I think this choice helps the base feel quite deliberate in its design.
The other big change in 2021, of course, is the light fixture inside the pedestal! I love how vibrant it makes the two-tone Trailheart look, and how it subtly glows in those stars as well. The lamp’s on/off buttons are completely unobtrusive, being hidden and flush in the bottom edge of the box’s front/back faces, respectively.
In the event that the brand-new daylight bulb I secured inside one day needs changing, the front and back panels are deliberately removable. All one has to do to remove the face is pull, rather than push, one of the actuator buttons to pop open the pedestal box.
In this opened view, you can see how the button actuator is built in an L shape. This is because, while the space in which I could integrate a button was at the very bottom of the pedestal, the lamp’s actual switch was about an inch higher.
The lamp’s cord has its own cavity through which it runs, letting the rest of the pedestal sit totally level on a flat surface. I also included a dimmer switch on the cord which makes the lamp inside adjustable; we didn’t want the brightness of the bulb to cause any problems on camera during the event, after all.
Thanks for reading! If you have any other questions or thoughts about this model, feel free to leave them in the comments below. And, if you’re interested in getting a model like this yourself, reach out to me about commissioning one of your own!