• Replicas
    • Icons
    • Creatures
    • Inventions
    • Characters
    • Playsets
    • LEGO Masters
    • About Me
    • Press
    • Testimonials
    • FAQ
  • Commissions
  • Blog
  • Store
  • Contact
Menu

Aaron Brick Designer

  • Portfolio
    • Replicas
    • Icons
    • Creatures
    • Inventions
    • Characters
    • Playsets
    • LEGO Masters
  • About
    • About Me
    • Press
    • Testimonials
    • FAQ
  • Commissions
  • Blog
  • Store
  • Contact
×

Behind-the-Build: Masonic Eagle

Aaron Newman August 19, 2021

I designed this enormous logo sculpture on commission for the Scottish Rite Masons in Massachusetts. Prior to this model, I had no experience with Freemasonry beyond, say, National Treasure, and I’m still no expert. Rather, to me, this project was an exercise in LEGO-izing unfamiliar iconography; it represented a chance for me to tackle a model I never would’ve thought to build on my own. When life throws me a challenge, I like to take it!

In that it’s a large-scale creature, sculpted with studs-out techniques, standing atop a big box pedestal, this Masonic Eagle logo exists in a similar vein and style to my Salesforce character pieces. However, the model also posed its own set of challenges and put forward its own unique questions.

Watch the video above for an in-depth exploration of this display piece, and read on for even more info about its design choices.
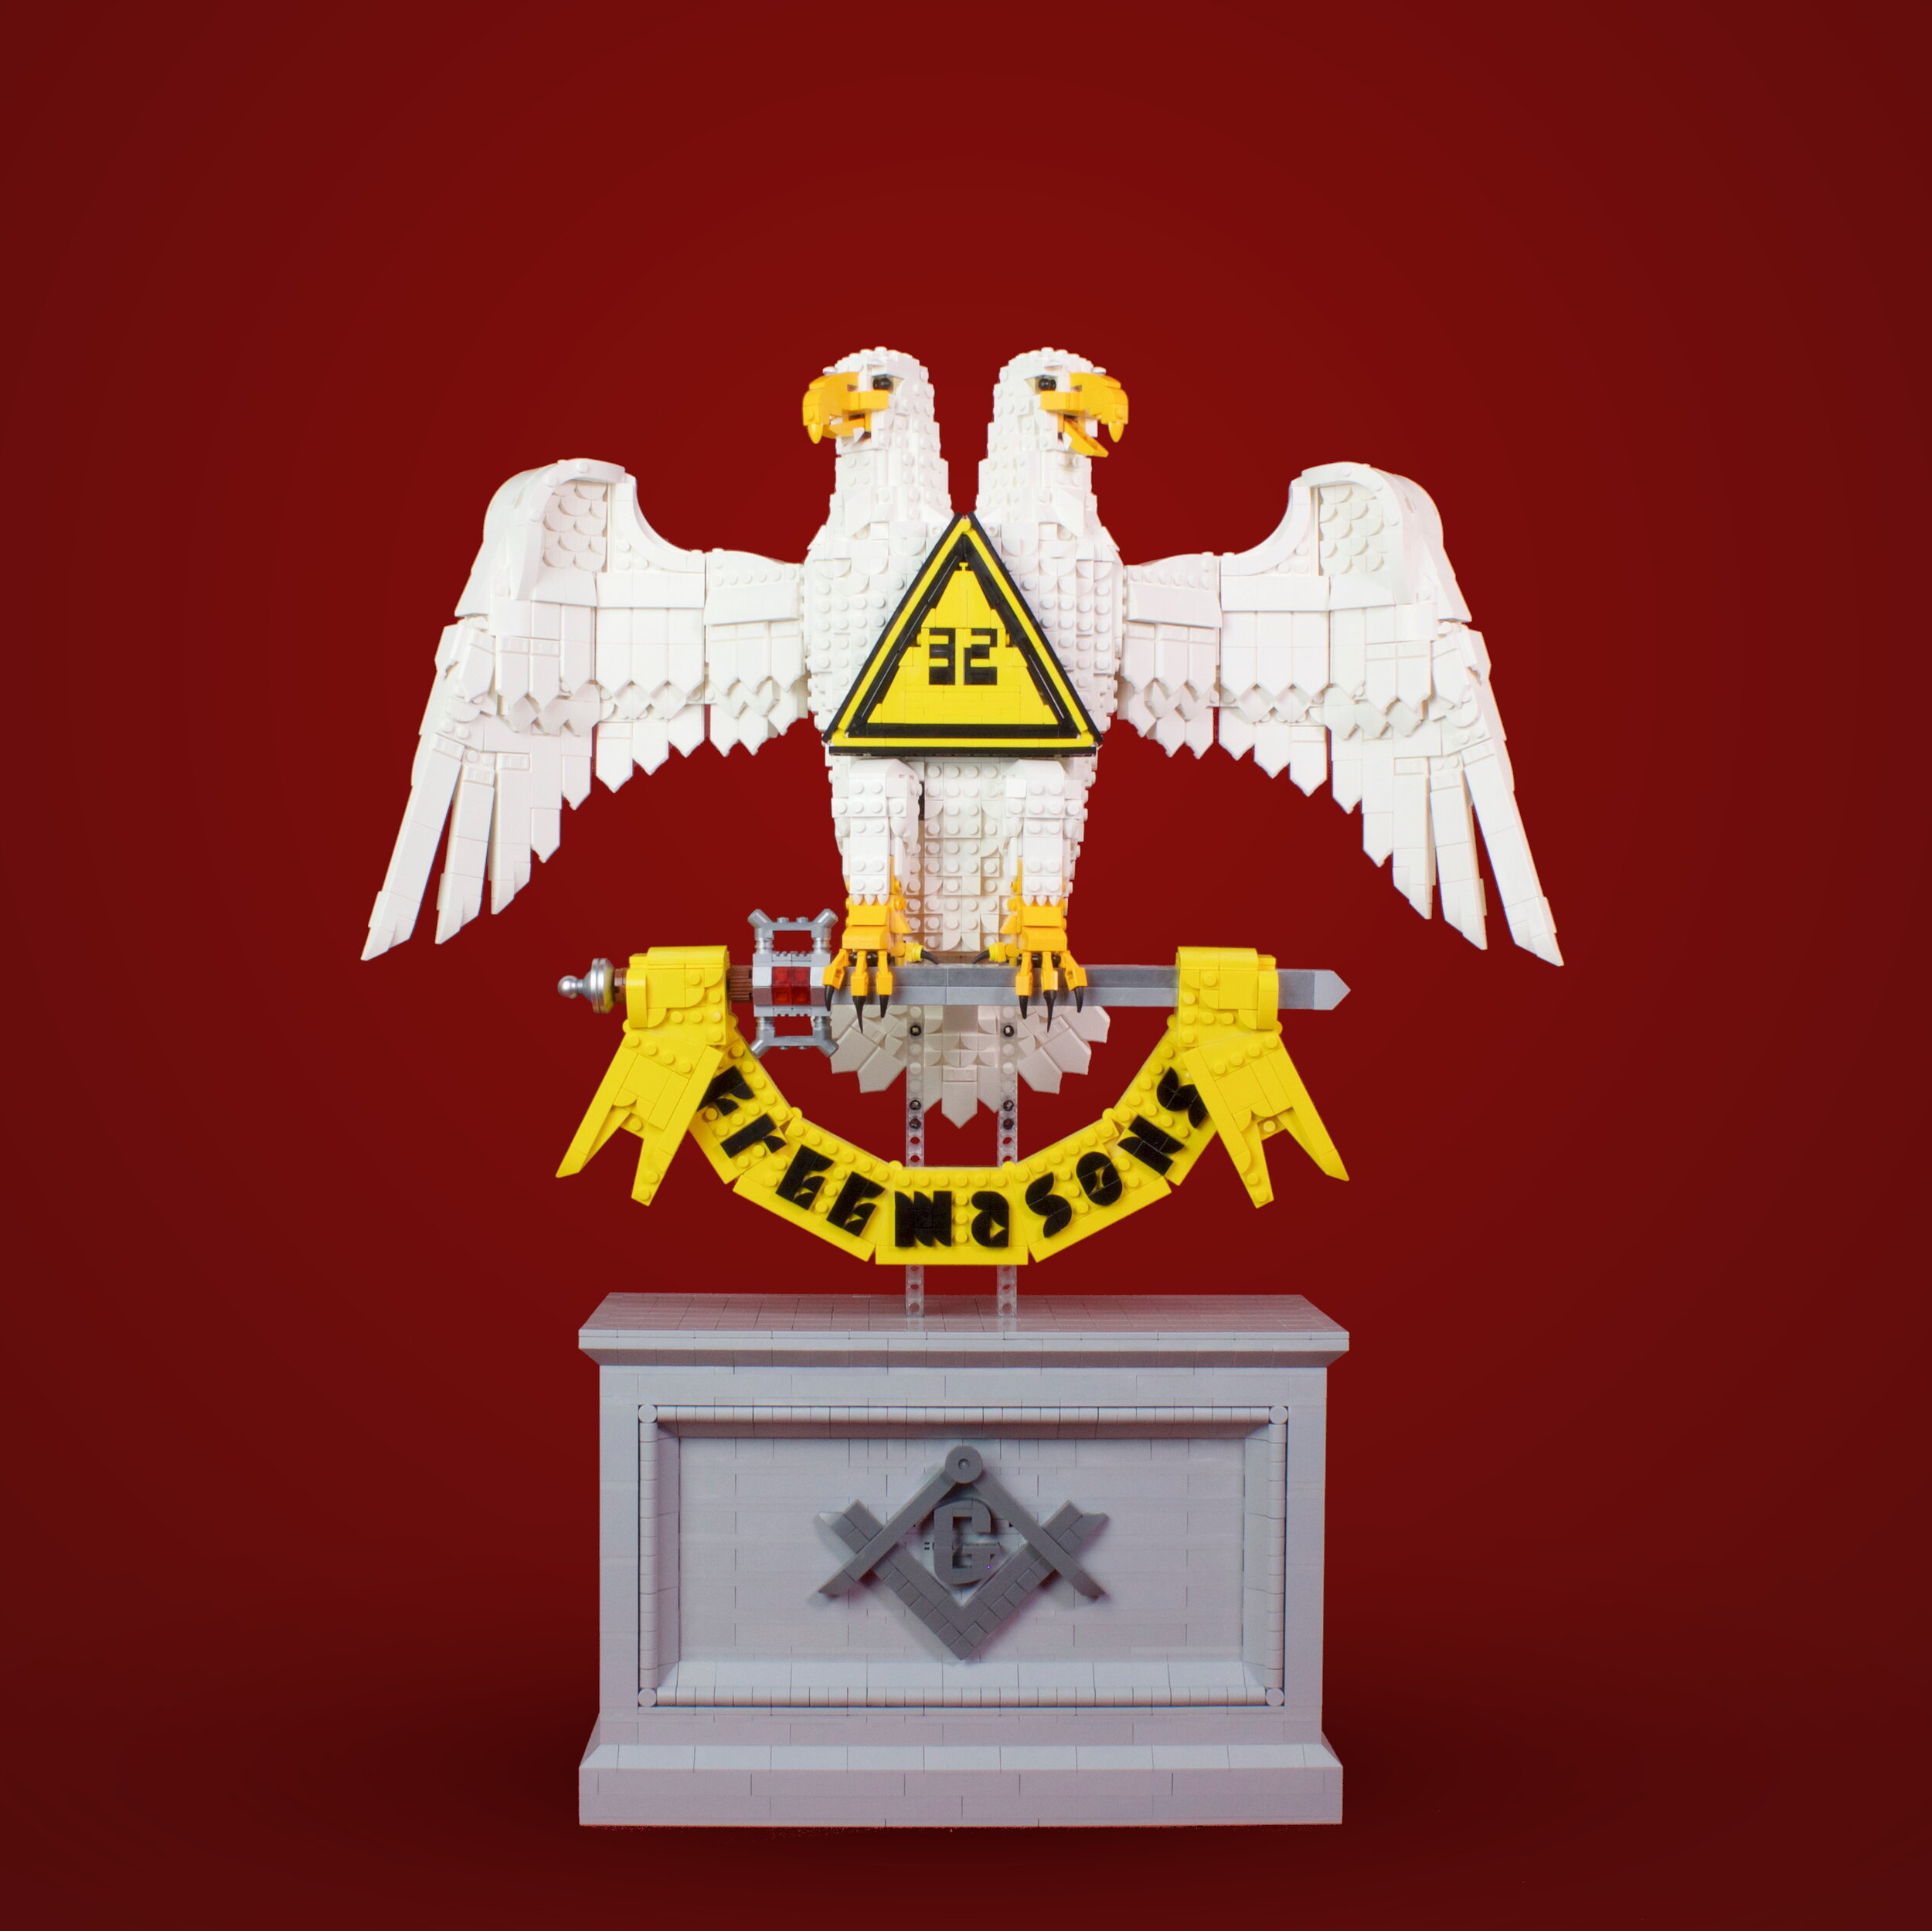
Masonic 32nd Degree.jpg
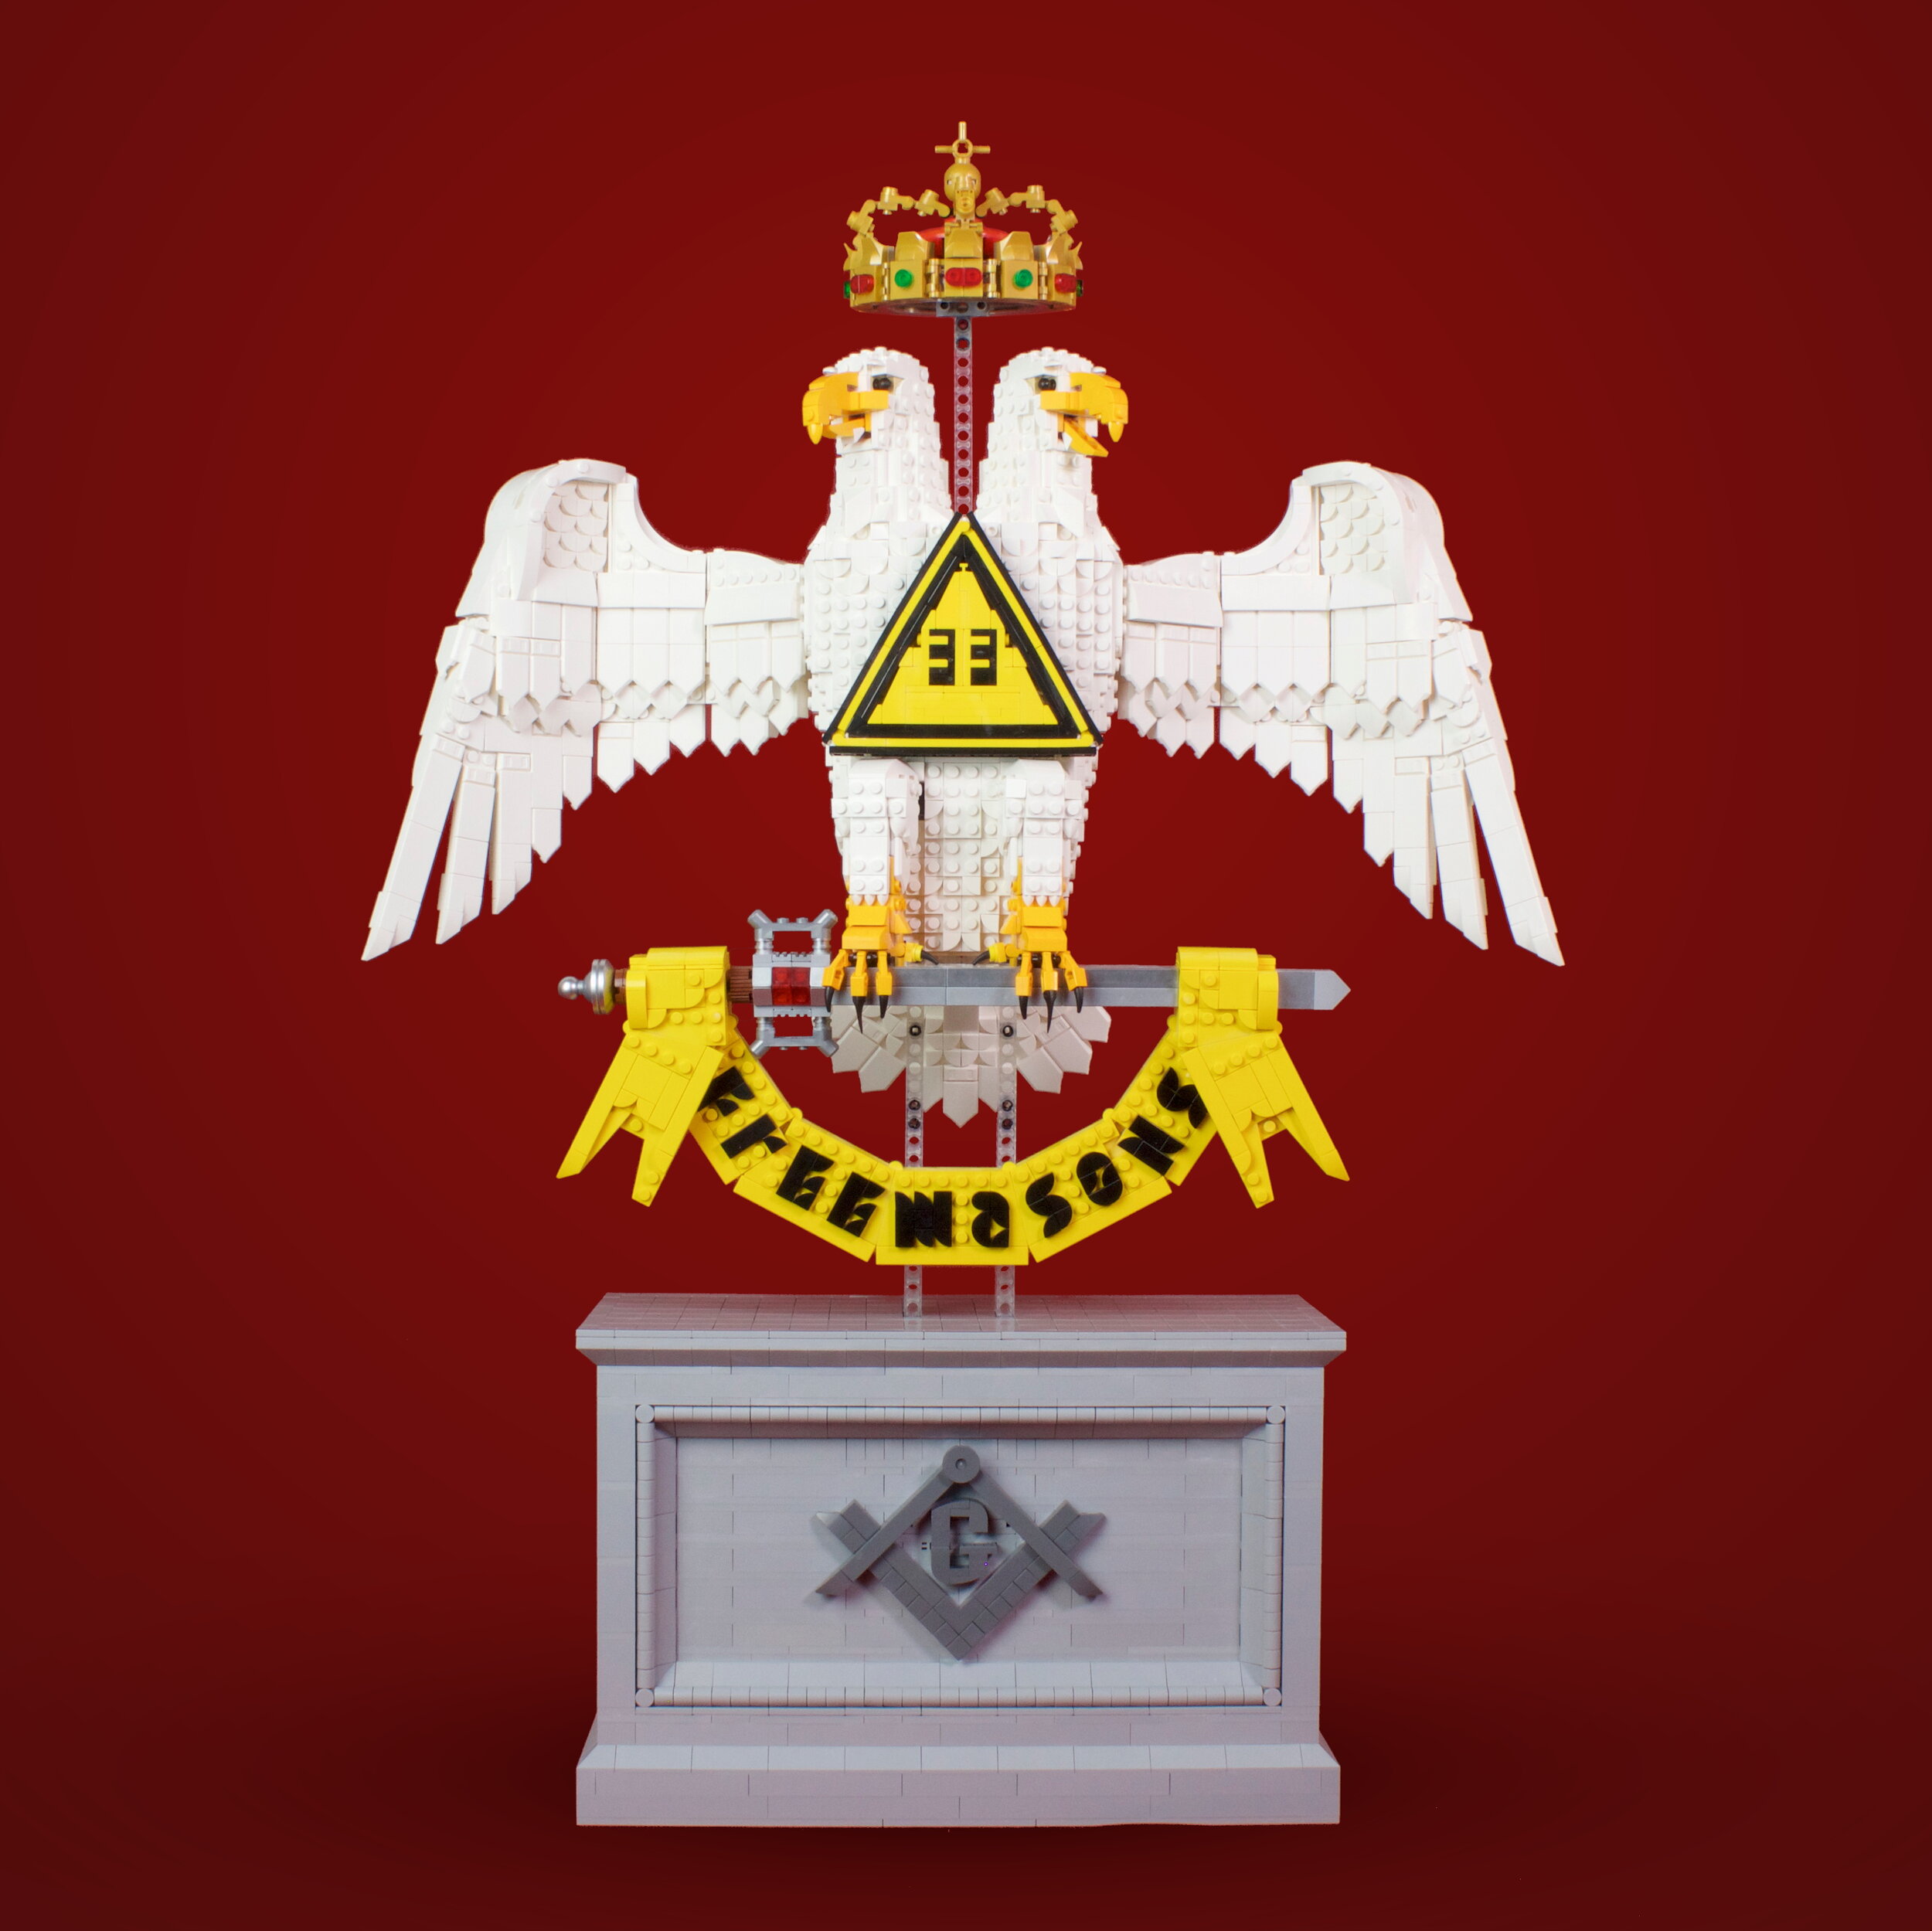
Masonic 33rd Degree.jpg

Something my client specifically requested on this model was the ability to transition it between a “32nd Degree” and “33rd Degree” version of the Scottish Rite’s logo. There are myriad degrees in Masonry, and evidently 33rd Degree is the highest one because, aside from getting a “33” on its chest, it also receives a crown hovering over the standard 2-headed eagle.

The crown is removable, sitting slotted into a notch between the eagle’s heads, while the triangular number plate is also easily interchangeable. The chest beneath the number plate is pretty flat, but it’s hidden well behind that equilateral triangle.

Without the crown, this model measures more than 24” (62cm) tall, while with the crown, it’s over 28” (72cm) tall.

Masonic Back.jpg

This sculpture entailed a good deal of engineering, given that the majority of the model “hovers” in space, supported only by two skinny Technic columns. The columns aren’t attached to anything; rather, their slim ends slot into deep grooves in the top of the pedestal and the bottom of the eagle.

Balancing this model atop its minimal base of support wasn’t really a challenge, though, since the columns stand directly beneath the eagle’s center of mass. Since the logo is essentially symmetrical in terms of its weight distribution, there isn’t much danger of it rocking or tilting… unless you reattach the wings one at a time, rather than simultaneously.

I’m very proud of the way the logo hangs in space. It speaks to the strength of LEGO bricks themselves, that I could accomplish such an effect!

I really loved getting to design the crown. To create the round, bejeweled headband, I’m stealing a technique seen in the likes of General Grievous’ Wheel Bike and Jestro’s Evil Mobile, where twelve 2x2 sections connected by modified plates wrap around a large wheel.

The heads of the eagle were a treat to design, too. I’m happy especially with how the beaks look, as well as the subtle touch of tan around the eyes to lend them more depth.

One of the rarest bricks on this model actually appears in the crown, almost hidden by the gilding around it: a 6x6 dish in red, which hasn’t appeared in a LEGO set for nearly 15 years!

During the design process, I dreaded nothing more than designing the eagle’s wings. Their unorthodox shape, layered feathers, and dynamic posture felt so daunting to approach, especially given the huge size and, therefore, weight they’d need to be. Luckily, I emerged with a solid first draft of these after just one build session!

The final wings are even heavier and burlier than I would have expected, but the shape I managed to get here—from the splayed “finger” feathers to the wings’ horizontal concavity—made all the extra engineering worthwhile. Most of their thickness comes from the myriad layers of feathers, which double as SNOT supports that hold the wings together vertically.

Once I had designed the wings, it was fairly simple to apply a similar patterning to the tail feathers. However, with the eagle’s extremities done, I realized that my torso was looking rather furry, rather than feathery. I say “furry” because the studs-out sculpting technique I used on this model is identical to the one I employed on my Salesforce Codey and Astro models, both of which had an intentionally fuzzy texture.

To differentiate and make sleeker the eagle’s body texture, I leaned heavily on 1x1 corner round “DOTS” tiles. Then, around the base of the eagle’s necks, I added extra texture and volume by using slopes of myriad descriptions, creating that distinctive “ruff” of feathers.

Like the crown, the sword is an object meant to stand out on the design against the organically-shaped eagle. I opted to make this weapon even more distinctive by cladding it, whenever possible, in LEGO’s metallic silver color. The impact is subtle but definitely helps sell this item as being made of metal.

In the end, I needed any extra help I could get selling the sword as a sword. Since this “blade” serves the critical function of supporting a weighty banner draped over it, it actually looks more like an iron girder on close inspection! The sword is 2 studs wide and 2 studs deep along the length of the blade, just to give it the necessary strength and integrity for its structural role.

Early on in the process of this project, I knew we’d need to include a strong base of support for the model. Since the 2D version of the eagle I originally received looks very much like the model you see here—i.e., the lowest point on the logo was the bottom edge of the dangling banner—there was no way other than an added pedestal to prop up, balance, and ground the model.

I did my best to turn necessity into asset here by making the plinth decorative, not just a boring foundation. I’ve sculpted it as if it were carved from marble or granite, with classical indentations, cut-outs, and molding.

Nearly 300 of the model’s 4600+ bricks are those 1x1 double curved slopes.

There are four different brick-built fonts across this creation:

  • The “32/33” in the triangle

  • The “Freemasons” text along the hanging banner

  • The “G” in the compass & square emblem on the front of the pedestal

  • The “Not Just a Man, A Mason” slogan on the back of the pedestal

The last of these uses a font that I first encountered in the Detective’s Office modular building back in 2015. In that model, there are only 3 letters of text, though, not 17! It was time and labor-intensive to get all these letters to fit on the pedestal, and the internal rod along which they’re all strung had to be a long length of flex tubing.

I mentioned earlier up in the entry, but the wings of the model are removable… as are the heads, legs, tail, crown, number plate, sword/banner, torso and support rods! The sculpture separates into large, more manageable chunks, which makes it easier and safer to ship. My clients plan to exhibit this piece in myriad locations, so it was important to me to ensure that the model could travel as safely as possible.

In most cases, aside from the separation points of these large chunks, the model is also glued for permanence.


Thanks for reading! If you have any other questions or thoughts about this model, feel free to leave them in the comments below.

View in Portfolio
In New Models Tags animal, icons, logo, eagle, Masons, Mascot, Freemasons, Scottish Rite, sculpture
← Get Your Game On!The Picture of Suburban Bliss →

Search Posts

No results found
Post Archive
  • New Models
  • LEGO Masters
  • Information
  • Website News
 

Featured Posts

Featured
Get Your Game On!
September 15, 2021
Get Your Game On!
September 15, 2021

I designed these life-size replicas of an MSI Aegis Ti5 desktop and an MSI Optix MAG274QRF-QD monitor on commission for MSI’s marketing department. Combined, these models clock in at more than 10,600 bricks, and over 42 lbs (14 kg) of weight, making them the biggest LEGO models I have ever designed and assembled under the auspices of my LLC. I can say with confidence that this was the most difficult LEGO-built project I’ve ever undertaken… and, as such, it’s one of the most satisfying to have accomplished. Needless to say, it feels amazing to finally get to share these two models with the world!

Watch the video above for an exploration of these epic display pieces, and read on for even more in-depth info about their process and design choices.

Read more →
September 15, 2021
Behind-the-Build: Masonic Eagle
August 19, 2021
Behind-the-Build: Masonic Eagle
August 19, 2021

I designed this enormous logo sculpture on commission for the Scottish Rite Masons in Massachusetts. Prior to this model, I had no experience with Freemasonry beyond, say, National Treasure, and I’m still no expert. Rather, to me, this project was an exercise in LEGO-izing unfamiliar iconography; it represented a chance for me to tackle a model I never would’ve thought to build on my own. When life throws me a challenge, I like to take it!

In that it’s a large-scale creature, sculpted with studs-out techniques, standing atop a big box pedestal, this Masonic Eagle logo exists in a similar vein and style to my Salesforce character pieces. However, the model also posed its own set of challenges and put forward its own unique questions.

Watch the video above for an in-depth exploration of this display piece, and read on for even more info about its design choices.

Read more →
August 19, 2021
The Picture of Suburban Bliss
July 20, 2021
The Picture of Suburban Bliss
July 20, 2021

I designed this replica of a private residence on commission. Although the client only paid me for digital deliverables—i.e., design services and instructions, but no physical bricks—I couldn’t resist splurging a little on parts to recreate my finished product in real life, with a few modifications of my own to “spruce up” the build. Yes, that was a pun, because yes, the addition of a towering redwood tree in the backyard was one of my biggest add-ons!

This 360-degree home recreation also features fully realized, furnished interior spaces, making it perhaps the most in-depth structural recreation I have ever completed at this size. Keeping balance between external and internal was a fun puzzle to solve, and while I was battling for space much of the time, I’m pleased with and proud of the final result.

Read on to learn more about the design choices behind this build, and to check out all the rooms of the house!

Read more →
July 20, 2021
Reach for the Stars: Building Astro
July 12, 2021
Reach for the Stars: Building Astro
July 12, 2021

I built this statue of Astro Nomical, a Salesforce character from their Trailhead software, for Salesforce’s TrailheadX 2021 (TDX21) virtual event. This piece was designed to scale with my Salesforce sculpture from last year’s event, TDX20, which was a statue of Codey the Bear. This year’s model, which is nearly 16” (40cm+) tall and consists of over 3,000 bricks, was a formidable undertaking mostly because of timing; just like last year’s piece, I had to complete my design and source the necessary bricks for it against an extremely tight deadline, which was a live-build of the final model for a virtual event.

My recreation of Astro intentionally emulates my LEGO Codey in terms of its design, composition, and techniques; as such, many aspects of the process were ones with which I’d already had experience. However, this project posed some new opportunities for growth, too. For example, Astro’s base includes a lighting element, the which I had to integrate with a LEGO-built infrastructure. The model also features custom decals, modified LEGO bricks, and a pretty dynamic pose.

I feel that LEGO-built Astro pays appropriate homage to my first TrailheadX live build model; in doing so, it reinforces a set style for my burgeoning Salesforce character series. But I also feel that this model advances my character-building format into new territory and breaks ground of its own, which makes me even prouder of the finished result!

Read on to learn more about the conception, construction, and design of this custom statue.

Read more →
July 12, 2021
What's Up, Dog?
January 27, 2021
What's Up, Dog?
January 27, 2021

I built these three miniature dog portraits on commission. I actually designed and photographed these models before I shared my larger-scale Cavalier King Charles Spaniel models but, as these mini-dogs were all intended as holiday gifts, I didn’t want to risk spoiling the surprise by sharing them any earlier!

Read on for a closer look at each of these dogs individually, as well as pictures of their real-life counterparts!

Read more →
January 27, 2021
Two Models Working in "Harmony"
December 20, 2020
Two Models Working in "Harmony"
December 20, 2020

I designed this 1:2-scale pair of Cavalier King Charles Spaniels on commission. They’re some of the first pet builds I’ve ever designed, and I feel quite proud with how they turned out.

Let me introduce you to two sweet dogs: Indigo (the “Tri-Color” Cavalier, with black, white, and brown coloration) and Harmony (the “Blenheim” Cavalier, with white and reddish coloration). Like most pet owners, my client loves and treasures his dogs. Out of respect for his adoration, I sought to recreate Harmony and Indigo as faithfully as possible, and to make the pair complement one another just like their real-life counterparts do.

However, I wasn’t always slated to build both Indigo and Harmony. Initially, my client approached me seeking just a 1:1 replica of Harmony, and I signed on to the project intending to produce a model in that size. So, why did I change scales?

Read on to find out why, and to learn more about the process and design decisions behind these models!

Read more →
December 20, 2020
Science on the High Seas
November 16, 2020
Science on the High Seas
November 16, 2020

I designed this replica of a real-life research vessel on commission. While I’ve done a few seafaring builds before, I’d never built a full-size modern boat prior to this project. I love to tackle new subjects, since they throw all kinds of unexpected puzzles my way; as such, I relished this project as a great opportunity to grow as a builder. In the end, I finished with a larger, cooler, and more beautiful model than I ever expected to produce.

Clocking in at over 2,000 bricks, this minifigure-scale recreation measures over than 20" (50cm) long and weighs over 4 lbs (nearly 2 kg). The boat also features 3 levels of carefully crafted interior details that emulate those of the actual vessel, which are accessible in the LEGO modular building style, via removable roofs and sub-layers.

Read on to find out what’s inside this vessel, and to learn more about the choices I made and challenges I faced during its design process!

Read more →
November 16, 2020
Behind-the-Build: Lost Boys Hideout
October 13, 2020
Behind-the-Build: Lost Boys Hideout
October 13, 2020

It was an absolute blast to design my interpretation of the Lost Boys’ hideout from the 1953 Disney animated movie Peter Pan. At 18” (45cm) tall—and over 1700 bricks—it’s quite a big creation, and took me more than a month to design and refine. Best of all, I opted to build and present this model as a “LEGO set,” complete with stable building techniques, play features, and a full assortment of minifigures. It just felt more appropriate to the subject material to channel some of my inner child, who loves nothing more than an exciting new LEGO kit. Like Peter Pan, I’m never growing up!

Watch the video above for an in-depth tour and exploration of the Lost Boys’ hideout, including demonstration of its play features, or read on to see detailed images and learn more about the design choices that went into this playset.

Read more →
October 13, 2020
'Tis the Season... of Spooky!
September 30, 2020
'Tis the Season... of Spooky!
September 30, 2020

I designed these famous Halloween characters in collaboration with Build Better Bricks (B3). Every year, B3’s head designer Tyler and I decide on two new monsters to build for the holiday; he does one, and I do one. During our inaugural Halloween season, I built the savage Werewolf on the left. For this year, I built a wicked Red Devil. Both figurines are highly articulated and detailed, and are designed as amalgamations of my favorite versions of these iconic monsters.

Read on to learn more about the design choices that went into each of these models, and to find out how I found my way to their striking photo presentation!

Read more →
September 30, 2020
I'm Offering Online LEGO-Building Classes!
August 22, 2020
I'm Offering Online LEGO-Building Classes!
August 22, 2020

With a pandemic afoot—and schooling moving online in many places—parents have had to get creative about how to keep their kids engaged and growing. Everyone wants a way for their children to learn, have fun, and stay safe at the same time. As such, the parents of LEGO®-loving kids have been asking me a lot lately if I teach any virtual building programs.

I’m so pleased and excited to announce that—finally—I have begun teaching online LEGO classes you can sign up for!

I’ve partnered with TestingMom.com, an industry leader in online learning for high-achieving kids, to offer an assortment of LEGO classes, taught by me, for students ages 6-12.

Read on to learn which courses I’m teaching, and to

Read more →
August 22, 2020
 

INSTAGRAM | FACEBOOK | YOUTUBE | FLICKR

© 2022 Aaron Brick Designer, LLC.

LEGO®, the LEGO logo, the LEGO minifigure, and the brick and knob configuration are trademarks of The LEGO Group. This site is not authorized, sponsored, or endorsed by TLG.